

Have you been working with Nintex Forms 2010 and hit a road block with a client requirement? Perhaps leveraging the Nintex Forms Object Model and building a custom control will help knock down that road block. In this blog post I will demonstrate a basic example of how to build a custom form control for your Nintex Form.
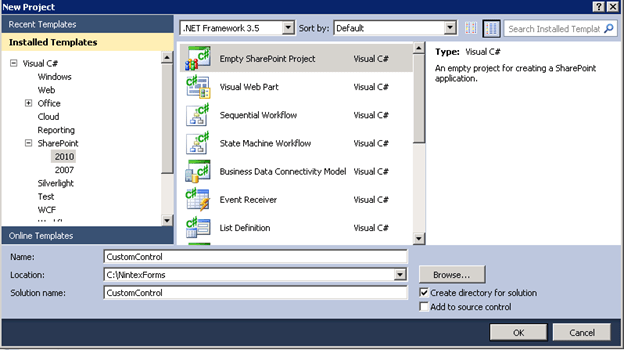
Let’s start things off by creating a Visual Studio solution with an empty SharePoint project.
NOTE: Your custom control cannot be deployed as a sandbox solution, it’s only deployable as a farm solution. The control will not be available in Nintex Live.
The next step is adding the Nintex.Forms.dll, Nintex.Forms.SharePoint.dll and System.web.dll as a reference in your project.
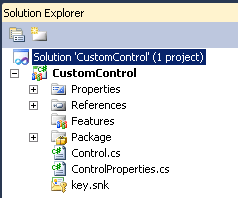
Now that we have the bones of the project set up we will have to create a class representing the control itself and another class representing the control properties (properties are presented and editable through the UI). After adding the classes, your project structure will now look like this:
At this point we can decide what type of form control you want to create. The details below show you what class to inherit from and its purpose:
// Provides the methods and properties of the control to interact with the design and runtime of the form
public class Control : BaseFormControl

// Container form control. This cannot be bound to a SharePoint column
public class Control : BaseContainerFormControl

// Bindable form control. This can be bound to a SharePoint column
public class Control : BaseBindableFormControl
In my example I will implement a bindable form control. As I mentioned, to implement a bindable control your control class must inherit from the BaseBindableFormControl class:
public class Control : BaseBindableFormControl
Your control property class also has to have proper inheritance and it must inherit from the BaseBindableFormControlProperties class (this would change based upon your inheritance used for the control):
public class ControlProperties : BaseBindableFormControlProperties
If you rebuild your solution you will see a pile of errors. This is just the compiler telling us that we have to implement the methods from the BaseBindableFormControl class we inherited in our control class. Let’s look at all the required methods that we need to inherit and I’ll give a high level overview of what their purpose is.
// Returns the unique form control type ID for the control
public override Guid FormControlTypeUniqueId

// Sends the actual markup of the custom control to the Nintex form designer
public override string GetCanvasDesignTimeHtml(FormControlProperties properties)

// Adds common properties to the control and gets extra information from the field we’re binding to
public override void ApplyDefaultFormProperties(FormControlProperties properties, FormVariable variable)

// Gets called on the form control data binding event. Can get the value of the control here.
protected override void OnFormControlDataBinding(object sender, EventArgs e)

// Will handle the adding to the data source if you’re binding to one field
protected override object GetUpdatedValue()

// Setup properties for the control in the designer. Properties such as display name, description, toolbox icon, etc.
protected override void Initialise()

// Returns the existing control properties (can resize, visibility, insert references, etc.)
protected override FormControlProperties GetDefaultFormPropertiesProtected()

// Returns the control properties that exist in the ControlProperties class
protected ControlProperties ControlSpecificProperties
As this is a composite control, you can also override methods such as OnInit or OnLoad. This is powerful because during these methods you can register custom JavaScript or CSS to your control. If you’re registering JavaScript then I’d highly recommend using the ScriptManager object. Microsoft has changed the way it loads its assemblies and classes between SharePoint 2010 and 2013. Using ScriptManager will make it more of an upgrade-friendly approach.
The code block below is the entire class for the custom control with the implemented methods. This class will render out a textbox that shows the display text property value defined in the control properties.
using System;
using System.Collections.Generic;
using System.Web.UI.WebControls;
using Nintex.Forms;
using Nintex.Forms.FormControls;

namespace CustomControl {
    public class Control : BaseBindableFormControl
    {
        protected TextBox CustomTextBox { get; set; }
        public override Guid FormControlTypeUniqueId
        {
            get { return new Guid("{24915A8F-AEDA-4972-8F7C-1DC52BB9C59F}"); }
        }
        protected ControlProperties ControlSpecificProperties
        {
            get { return this.FormControlProperties as ControlProperties; }
        }
        public override void ApplyDefaultFormProperties(FormControlProperties properties, Nintex.Forms.FormVariable variable)
        {
            base.ApplyDefaultFormProperties(properties, variable);
        }
        public override string GetCanvasDesignTimeHtml(FormControlProperties properties)
        {
            var castedProperties = properties as ControlProperties;
            var controlSpecificProperties = castedProperties ?? new ControlProperties();
            TextBox controlToRender = new TextBox();
            controlToRender.Text = castedProperties.DataFieldDisplayName;
            controlToRender.Enabled = false;
            return RenderControlToString(controlToRender, controlSpecificProperties);
        }
        protected override void CreateFormControls()
        {
            CustomTextBox = new TextBox();
            CustomTextBox.Text = this.ControlSpecificProperties.DisplayText;
            this.Controls.Add(CustomTextBox);
        }
        protected override FormControlProperties GetDefaultFormPropertiesProtected()
        {
            return new ControlProperties();
        }
        protected override void Initialise()
        {
            this.DisplayName = "My Bindable Control";
            this.Description = "My bindable control desription to be shown in tool tips.";
            this.GroupName = "My Custom Controls";
            this.CanResizeWidth = true;
            this.CanResizeHeight = true;
            this.IsRepeatable = true;
            this.ToolboxIconUrl = "/_layouts/NintexForms/images/NF_32x32_ControlSingleLine.png";
            this.HelpKey = "Nintex.Forms.Controls.Control"; // if you ship a custom help file include the key here
            this.SupportedValueTypes = new List<Type>(new[] { typeof(string), });
            this.SupportedFormControlTypes = new List<FormControlType>(new[] { FormControlType.SingleLine });
        }
        protected override void OnFormControlDataBinding(object sender, EventArgs e)
        {
            var value = this.GetValue();
            if (value != null)
            {
                this.CustomTextBox.Text = value.ToString();
            }        }
        protected override object GetUpdatedValue()
        {
            return this.CustomTextBox.Text;
        }
    }
}
The code block below is the entire class for the custom control properties.
using System.Runtime.Serialization;
using Nintex.Forms;
using Nintex.Forms.FormControls;

namespace CustomControl {
    public class ControlProperties : BaseBindableFormControlProperties
    {
        [DataMember, ControlPropertyInfo(
            DisplayName = "Display Text",
            Description = "This is the text that will be displayed in your control.",
            GroupName = NfConstants.CommonResourceStringNames.ControlPropertyGroupGeneral,
            DisplayOrder = 10,
            ChangeAction = ControlPropertyChangeActionType.RefreshFromServer,
            IsPrimaryProperty = true,
            AllowInsertReference = false
            )]
        public string DisplayText { get; set; }
    }
}
Since this is a SharePoint project the last thing we’ll want to do is write a feature receiver for the control registration and deregistration. This means when you activate the feature you can register the control to the available Nintex Form control listing. Alternatively, if you deactivate the feature it will deregister the control from the available Nintex Form control listing. The feature will be farm scoped and you must have a reference to the Nintex.Forms.SharePoint assembly (in the GAC).
public class FarmEventReceiver : SPFeatureReceiver {
    public override void FeatureActivated(SPFeatureReceiverProperties properties)
    {
        RegisterControl(new Control());
    }
    public override void FeatureDeactivating(SPFeatureReceiverProperties properties)
    {        UnregisterControl(new Control());
    }    private void RegisterControl(IFormControl control)
    {        FormsSettings settings = FormsSettings.Local;
        settings.AddFormControl(control);
        settings.Update();
    }
    private void UnregisterControl(IFormControl control)
    {
        string id = control.FormControlTypeUniqueId.ToString("D");
        FormsSettings settings = FormsSettings.Local;
        settings.FormControlCollection.RemoveAll(f => f.Id.Equals(id, StringComparison.CurrentCultureIgnoreCase));
        settings.Update();
    }
}
After registering the control you can verify it exists in the available Nintex Form control listing by browsing to SharePoint Central Administration -> Nintex Forms Management -> Manage Form Controls.
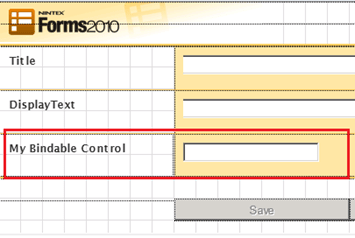
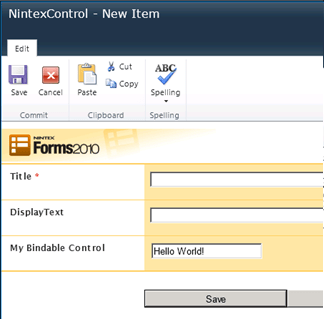
After you’ve successfully imported the custom control any list in SharePoint that’s using Nintex Forms will now have this control available:
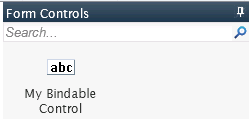
You can simply drag and drop it onto the form. I’ve added some CSS and label in front of my control to spice it up.
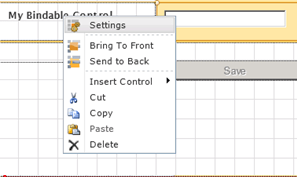
The next step is configuring the display text property we set up on the control. Right click the control (textbox) and select settings:
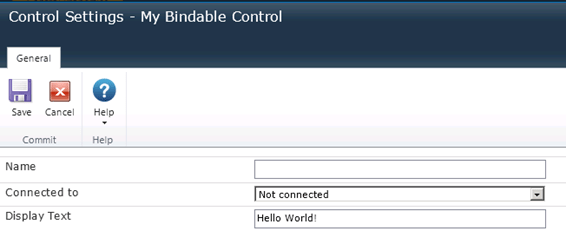
You’ll now see the control properties. You can also see the “Display Text” property. I've added “Hello World!” as my text to display.
I should note that you can change what groups the properties go under. This is all done on the GroupName attribute on the specific property.
Once you have added your display text you can save and publish the form.
Since this is a bindable control, we can bind it to an existing column on that SharePoint list. You can do that by going back into the control settings and configuring the Connected to property.

There you have it. A basic example of how to create a custom form control using the Nintex Forms Object Model. My example was basic, but it opens the doors to a lot of possibilities with Nintex Forms. I can see building a custom control for the following scenarios:
- Dropdown list that prepopulates other fields based upon a selected value (combination of server code, CSS and JavaScript)
- Custom validation of input against a web service (e.g., verify an account number exists in a system before saving it to the SharePoint list)
- Bring back data from the SharePoint user profile service based upon an entered username
- Providing a unique look and feel


