

Unfortunately, this scenario is rarely the case which is why using validators can ensure that content authors are entering valid content, thus preventing any issues with site functionality, and layout or information architecture.Sitecore comes with a set of out-of-the-box validation rules for common scenarios such as required fields, max length restrictions, email addresses and more. However, there will be cases where the out-of-the-box validation rules don’t meet your needs. This is where creating custom validation rules will come in. Fortunately, this is a relatively straightforward process.
Creating the custom validator
We’re going to use a validator that we created to validate that a general link field includes a value in the link description field (to use as the text for our link) as an example.
First, create the custom validator, which extends StandardValidator from the Sitecore namespace.
[Serializable]
namespace Habanero.Project.Validators
{
	// This validator ensures that the description attribute of a link is specified
	public class LinkTextValidator : StandardValidator
	{
		public override string Name
		{
			get { return "Link text validator"; }
		}

		public LinkTextValidator() {}

		public LinkTextValidator(SerializationInfo info, StreamingContext context) : base(info, context) { }

		protected override ValidatorResult Evaluate()
		{
			Field field = this.GetField();
			if (field == null)
				return ValidatorResult.Valid;

			string str1 = this.ControlValidationValue;
			if (string.IsNullOrEmpty(str1) || string.Compare(str1, "", StringComparison.InvariantCulture) == 0)
				return ValidatorResult.Valid;

			XmlValue xmlValue = new XmlValue(str1, "link");
			string attribute = xmlValue.GetAttribute("text");
			if (!string.IsNullOrEmpty(xmlValue.GetAttribute("text")))
				return ValidatorResult.Valid;

			this.Text = this.GetText("Description is missing in the link field \"{0}\".", field.DisplayName);
			// return the failed result value defined in the parameters for this validator; if no Result parameter
			// is defined, the default value FatalError will be used
			return this.GetFailedResult(ValidatorResult.CriticalError);
		}

		protected override ValidatorResult GetMaxValidatorResult()
		{
			return this.GetFailedResult(ValidatorResult.Error);
		}
	}
}
To ensure that our custom validator works with the validator button, we need to add the serializable attribute to the class as well as define the constructors. Otherwise, the validator button would throw an exception. We also override the Name property and the Evaluate method. This is where we add our custom validation code.
As you can see, we first perform some basic null checking to ensure that the field, and ControlValidationValue are not null or empty. If either of those values are empty, we return a Valid result so that the field isn’t validated any further (we only want to validate the text property if the link field has a value). We then check the value of the “text” attribute, and if this value is null, or empty, we define custom error text, and return a “CriticalError” validator result so that the author knows that there is an error, but is still able to save (more on this below).
Creating the validation rule in Sitecore
Now that we’ve created our custom validator, we need to add the validation rule item in Sitecore. Field validators are located in /sitecore/system/Settings/Validation Rules/Field Rules/.
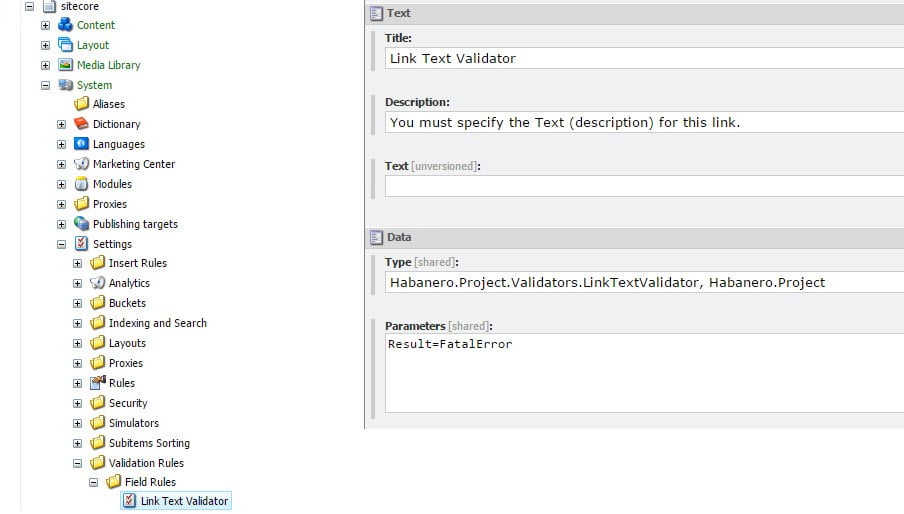
Notice that we point the type to our custom-created class and that we’re assigning the “Result” parameter the value of “FatalError.” All validators have a parameter titled “Result” which determines what the default result of the validator will be. Values for this parameter are:
- Valid
- Suggestion
- Warning
- Error
- CriticalError (Author is warned, but is still allowed to save)
- FatalError (Author is prevented from saving the item)
By passing in a value to the “Result” parameter here, we can override the default value we set in code (CriticalError). You might wonder why we’re doing this, so let me explain.
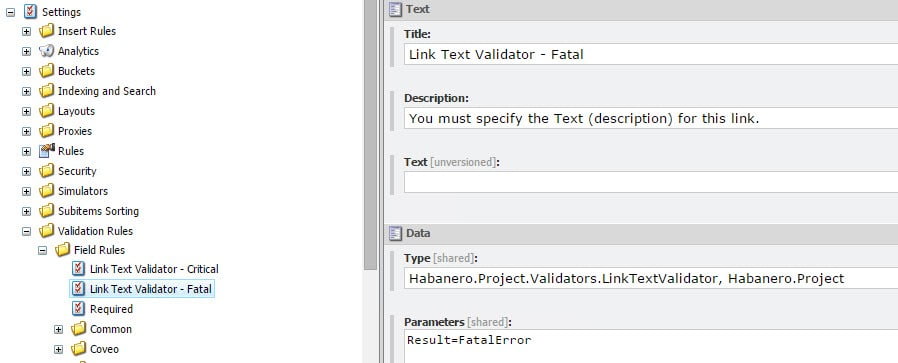
You may want to apply different validation behaviour depending on how validation is triggered. In our case, we wanted validation to fatally fail and not complete the workflow, but we still wanted the author to be able to save their work and not lose progress. To accomplish this, we created two validation rule items, both pointing to the same validation class, but each passing in a different “Result” parameter (CriticalError and FatalError).
Applying the validation rule to your field
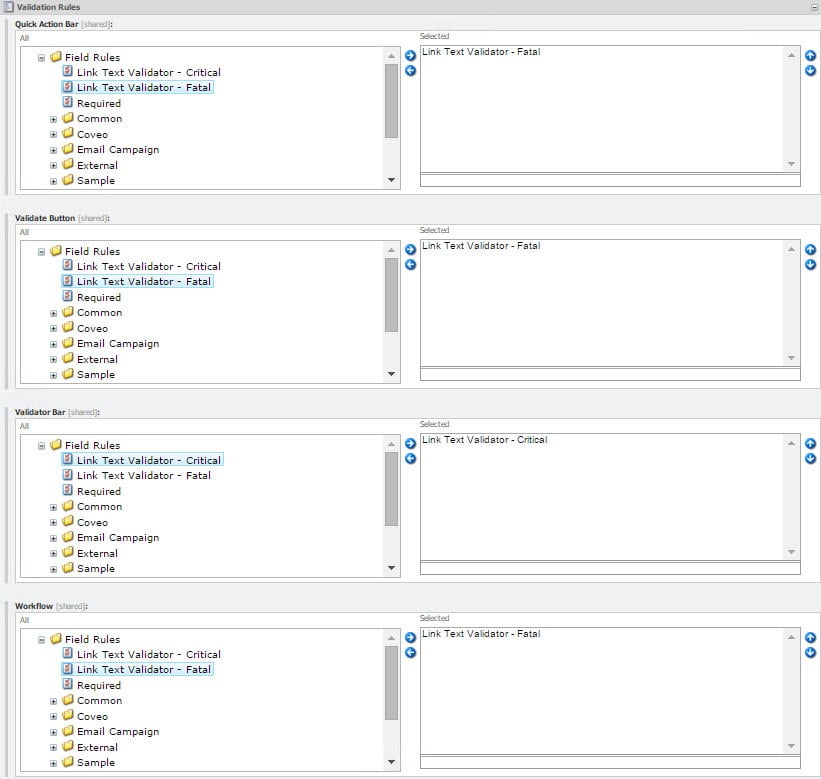
Now that we’ve created a couple rules, we want to apply them to our field requiring validation.
To do so, select the according field on the template you want to validate, and expand the “Validation Rules” section. You’ll notice there are four places to add validation; Quick Action Bar (which runs validation in the bar left of the content tree), Validate Button (which runs validation after clicking the Validation button in the review tab), Validator Bar (which runs when you save the item, and in the bar to the right of the content editor), and Workflow (which runs on the workflow action). This allows us to apply different rules depending on how validation is triggered (in our case, allow the author to save but not publish in a case where the link text is null or empty).
Conclusion
By following these steps, not only have we created a custom field validator for Sitecore, but we’ve showed how to control the validation behaviour depending on how it is triggered, thus allowing us to apply validation without impeding an author’s progress.


